

As always, unless you want to be the ghost haunting the crypt, make sure you take all necessary safety precautions.
The crypt was a great success. We had a steady stream of gawkers coming to check out our animated ghost, and she served as a considerable draw to our other attractions. We even had some souls who were brave enough to venture into our graveyard to get a closer look.
Materials
The total cost of this project runs in the $350 range, although there are several opportunities for cost savings, depending on what you're willing to sacrifice, or what you might have lying around your home. If the price is too steep for you, you can also spread the cost of this project over two years by having a static ghost the first year and adding the motorized puppet platform the following year.
The Ghost
First, you are going to need to purchase a Flying Crank Ghost kit from the good folks at Phantasmechanics and assemble it. (Or, you can build your own from the instructions on their site.) This provides the ghost and mechanism, and will run you about $180.
If you don't want a motorized ghost, or if you can't afford the entire effect the first year, you can simply fabricate one from their instructions and hang it statically with fishing line for about $10, maybe with an oscillating fan to give it a little motion. But trust me, the effect is well worth the money, and the provided instructions are such that pretty much anyone can put it together from the kit.
The Crypt
To build the crypt, you will need:
18 1"x4"x8' wood boards
2 1"x1"x8' wood board
Two large garden gate hinges
2 .5" PVC tubes
1 1" PVC tube
Lots of wood screws, long enough to go through one and a half boards
Lots of flat-head nails
Twelve L-braces (a flat rectangle of metal bent to a 90° angle)
Four flat L-braces (a flat "L" shaped piece of metal with four screw holes)
Saw (a chop-saw is handy if you have one)
5 4'x8' sheets of pink insulating foam
1 gallon can flat black latex paint
1 29oz. can medium gray flat latex paint
Large paint brushes
Drop cloth
Duct tape
Utility razor or X-acto knife
Dremel router (preferred) or soldering iron
Fluorescent black light fixture
Power strip and extension cord(s)
CD player (optional)

These materials create a crypt that is about 7'6" tall and has a footprint of about 4'4" square. The roof is wider than the footprint, and is about seven feet from end to end.
Note that a real crypt wouldn't only be four feet deep, unless it was for a very short person or a child. Since our visitors would only see the crypt from the front, this wasn't deemed a problem, but if you need a more realistic adult-size crypt, use these instructions and plan ahead to make a double-deep crypt.
Construction
Assembling the Phantasm
First, build your Flying Crank Ghost according to the instructions from Phantasmechanics. It's a good idea to have your FCG ready before building the crypt, because you'll want to check it against the size and weight of the ghost and its mechanism, or at least hang it up in there when you've got the crypt frame built for a little fun.
Spend some time with the ghost - don't just knock it out quickly - because this is what your visitors will really be looking at. Here's my nephew giving the ghost some real hands instead of the white card stock cutouts we had as placeholders:

I strongly recommend going the extra mile and adding LED eyes. As an electronics neophyte, I was able to follow the instructions easily, and soldered my first electrical circuit for this project, and it was pretty easy. If you're new to electronics, this is a really good starter project.
Assembling the crypt frame
Before getting started, be sure to sketch out your crypt design with a detailed plan so that you know what you're doing, especially if you're going to be making modifications to the plans presented here. Make sure you understand how it all works together, because you'll have to make some adjustments and cuts along the way to make everything fit, and you don't want to cut the wrong thing.
Once you've got a plan in mind, you can start building the crypt frame.

1. Build the left and right frame walls
The left and right frame walls are the same. Cut two 1"x4"'s down to 6' lengths, and then cut four down to 4' lengths. Using these, you can assemble the two frame walls using the short wood screws. The top and bottom supports should be flush with the top and bottom of the left and right supports, but the other two can be placed anywhere - they're just there for adding rigidity to the structure.

2. Build the back frame wall
The back frame wall is almost identical to the left and right frame walls, except if you put the supports in the same place, they'll run into each other. I only used one support across the back, but you could use two if you like.

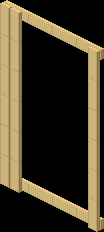
3. Build the front frame wall
The front frame wall is fairly similar to the other walls, except that because the front will be open, we cannot place horizontal support bars anywhere but the top and the bottom.
In addition, we are going to need a place to mount the gate, so we attach another 1"x4" vertically next to the leftmost one. This is the first wall you'll build where the inside and outside facing matters, so keep in mind the rule for which side of a frame wall is facing "outward": The vertical beams always face outward so that there is more surface area to attach the foam to.

Before you assemble the crypt, now is a good time to build the gate that will hang off of the front of the crypt, since you can lay it down on the ground with the front frame for reference.
The gate assembly is rather simple. It is two lengths of thick PVC about three feet long with holes drilled in it for three thin lengths of PVC to be dropped into.
Lay the front frame on the ground for reference, and measure the PVC lengths you want. It helps to place another 1"x4" on the right hand side so you can visualize how wide the actual opening will be. Mark the PVC how you want it, and drill the holes to create the gate you want.
To actually drill the holes, it helps to construct a cradle out of scrap wood for the PVC to lie in while you drill. A pilot hole also helps - drill a small hole first to guide the larger hole.
If you want, you can now attach the gate hinges to the frame, but don't attach the gate yet. (The gate hinges we found allowed the PVC to just slide onto the hinge, which we could then tighten with a screw through the PVC, so the gate was easily removable.)


5. Assemble the base frame
Now you can screw the frame together using the L braces to form a free-standing structure. Remember: vertical beams always face outward.
Note the position of the side walls and the front and back walls. You will be screwing through the side walls into the front and back walls to attach them, so that the front and back of the crypt are flush with the sides of the side walls.
This is so that the crypt presents the largest area towards your visitors, but it does make the crypt wider than it is deep by several inches. If this bugs you, screw them in the other way, but note that this will change the way you assemble the foam pieces that go around the crypt later, so be sure you've thought ahead!


Now comes the part where a table chop saw comes in really handy. You need to cut the 1"x4"'s to get four four-foot-long pieces with a straight cut on one end, and an angled cut at the other end.
The first thing you'll want to do is figure out how steep you want your pitched roof to be. We decided a 30° angle was good for us, so we cut the angle at 60° (90° - 30°), but you can use whatever angle you want.
Since one end of the support will be angled, make sure you measure the longest side - this is the side you want to be four feet long, the side that faces up. (This is because the roof is going to be a 4'x8' sheet of foam cut in half, so the length of each roof section needs to be 4'.)
Make sure that they sit flush against each other nicely so they can be easily attached to each other later.

Lay two of the gable supports down on the ground, and position them so that the pitch ends are flush. Lay another 1"x4" across it horizontally and measure it for length, and cut it. Screw it into the gable supports to give it support. The side you screw this support beam into will be the inside of the crypt.
Then, screw in two L-braces at the apex of the gable, on the same side as the support (the inside), to hold the gable supports together at the top.
Repeat this process for the other pair of gable supports.
Cut two lengths of the 1"x1" so that they are four feet long minus the width of the two gable pieces. Place a gable support frame on the ground, then put the lengths of 1"x1" on it, and then put the other gable support on top of that. Measure to make sure it's 4' tall, and then start screwing through the gable supports into the bases of the 1"x1" to create crossbars that go between the gable supports.
You should now have a gable support structure that is free-standing. If it seems wobbly, reinforce it with more support beams - you don't want this assembly coming apart, because it will take your crypt and your ghost along with it if it does!

Now, if you were to try to put the gable structure on the base structure right now, you'd be balancing it on sloped beams, which isn't exactly stable, so we're going to cut some little notches in the bottom side of the gable structure to give it some flat places to sit on the base structure. (See the diagram and the photo below.)
This part requires some helpers. Lift the gable structure onto the base structure, and mark the gable support beams where the outermost parts of the crypt structure reach. Make sure your structure is level, and double-check your structure with a level and measurements - you don't want a lopsided crypt roof (or maybe you do).
Once you have those points, you can cut vertically up a few inches and then horizontally across to create a notch that the base frame can slip into. Ideally, the fit will be snug, but as long as it can sit on the notches, you're good. Test it when you're done to make sure you don't need to make any adjustments - it should fit squarely on all four notches.


Now, assemble it all, and hang your FCG in there to see how it feels, both from a visual sense and a stability sense. Add support if you need it.
You should now have a sturdy, standalone wooden frame for the crypt, large enough to house your FCG. Note that the gable structure is removable for easy (or, at least, easier) storage and transportation. If you have the storage space, you could attach the gable structure now for more stability.
You are now ready to start building the foam facade for the crypt.
Skinning the Crypt
The next thing to do is cut the foam that will go around the crypt enclosure. Once it is cut, it will be carved and painted to look like stone, but first, you need all the pieces ready.
We used a utility knife to cut the foam. It helps to have a straightedge handy for precise cuts (like the hinged part of the roof), but since you are going for a rough-hewn stone look, don't fret too much about getting perfectly straight lines on your other cuts - you're just going to be carving them into irregular shapes anyway.

The roof is very easy to make. Since the gabled areas are 4'x4', we can simply cut a 4'x8' sheet of foam in half to form each side of the roof.
Once they're cut apart, reattach them with a long strip of duct tape on one side. This will act as a hinge. If you don't like the long groove along the top, lay the hinged roof on the gable assembly so that it falls flat on the gable supports, and duct tape the other side. This will make your gable roof so that it cannot be folded, but the roof will look better. (Whether you do this is probably going to depend on whether anyone will be able to see the roof, and whether you will be able to store the foam roof on top of the gable assembly.)

11. Make the roof runners
Next, you'll want the foam pieces that will cover up the gable support beams on the roof assembly. We found it is easiest to do this by placing the gable assembly with the back side flat on the ground, and propping the roof foam pieces up against the gable assembly.
Once you have the assembly on the ground, you can lift it up and carefully lower it onto a sheet of foam to trace around the edges. These pieces should overlap the roof foam and hang down a bit below the gables. They should not follow the notches you cut to place it on the frame (indeed, the primary purpose of these foam pieces is to hide the notches).
Cut out the traced areas, and hold them up to the assembly to make sure they fit nicely.

Next, prepare the left and right walls. These walls are fairly straightforward, because they measure 4'x6', so all you have to do is cut off one of the foam sheets at six feet.
However, because the gable assembly fits down on the notches you cut earlier, you need to cut some small notches in the foam walls to accommodate where the gable assembly drops down over the wood.
Since this part is going to be largely hidden, you can just "eyeball it" and cut it freeform. Just go slowly and keep testing the foam up against your crypt frame until it fits.

13. Make the back wall
Now that you have your left and right walls, you can measure the entire width of the crypt for the back wall.
You're going to need more than one sheet of foam to cover the back wall. The back wall frame, like the others, is only 4' wide, but you also need to cover the thickness of the left and right wall assembly and the foam walls.
What we did was just cut off a 4'x8' sheet of foam at six feet to form the center part of the back wall. Then, we cut two thin strips to go on either side to fill the back width, and duct taped them in place on the inside-facing part of the foam.
(The reason we did two instead of one is so that we could incorporate the cut into the design of the foam carving later, and still have it be symmetrical. A smidge more work, but worth it. The vertical stripes ended up being decorative columns of brickwork.)

The front walls can be made now. Like the other walls, these will be about 6' tall. To get the width of each of the two front wall sections, start with the wall on the gate hinge side. Measure from the left wall foam to the edge of the hinge support beam to get your wall width, and duplicate that wall width for the other side.
Note that these parts need to accommodate the roof runners you made in the steps above, so the outer upper corners are going to have to be trimmed. The easiest way to find the right trim is to set up the gable structure on the crypt with all the foam, and just trace the actual edge of the roof runner.
Also, cut notches to accommodate the gate hinge.

The only foam walls left to cut are the two detail panels that sit just under the gable assembly beams and sit on top of the front and back wall assemblies.
These triangular pieces of foam should be cut to fit snugly into their spaces, as they will probably be looked at - these panels are good places to add detail to your crypt.
The best way to get a good fit is to do the same thing you did to make the gable covers - turn the assembly on its side and trace the outlines needed.
Detailing the Crypt
Once you have all your foam cut, the detailing and painting may begin. The first thing you want to do is carve your foam to look more like stone. We used two approaches:
Dremel Mortar Lines
Using a Dremel tool with a router attachment, we were able to quickly
carve mortar lines into our crypt walls. As a guide, we gridded off our
crypt walls in six-inch squares, and then used the dremel to outline
the grid lines in offset pairs. Here and there, we'd add a crack or a
broken brick to suggest that the crypt is very old.
Xacto Stone Edges
Along the edges of the crypt, we used an Xacto knife to cut mortar
grooves that went around the corner, and to round off the sharp edges
to make it look like stone. Holding the Xacto knife at an angle and carving
out the foam allows you to create realistic-looking stone edges.

You could use either method, or both, to add the detail to your crypt. Just plan ahead, work slow, and pay attention, and you should be able to realize whatever ideas you have for the details of your crypt. Also, remember that the crypt doesn't have to be perfect - it's crumbling, after all. If you goof up, don't fret about it too much. (If you REALLY goof up, you can always glue some foam pieces back in place.)
Painting the Crypt
Once all the detailing is done, you can start painting your crypt.
It's a good idea to have the same small group of people paint the entire prop. This helps keep the painting quality and colors consistent - if you had a different person painting each wall, they could look like they came from different places.
Depending on where you are doing your painting, you might want to have a drop cloth, and think ahead about where you're going to lay down the paintings when they're wet and need to dry.

The Base Coat
The first order of business is put on the base color coat - black. Use the latex paint and/or spray paint and start painting everything black. Use the spray paint on the wooden frame to quickly cover the Only use latex paint on the foam bits - things like spray paint and some other non-latex paints will dissolve the foam. To speed things up, you can use flat black spray paint on the wooden frame.

Also, remember to paint the backs of all the foam pieces, or else the inside of your crypt will be pink.
The Highlight Coat
When the base coat is dry, come back in with another brush, this time loaded up with the gray color. "Drybrushing" here works rather well. Basically, you want the paint on the brush to be nearly dry when you paint it on, because the paint will pick up the texture of the foam or wood, and won't completely cover the black.

Finishing Touches
Once you have all the foam pieces painted, your crypt is pretty much done, but there are still some finishing touches that can be done.
First, there are a few pieces of wood (that should be painted black now) that are not covered by the foam pieces. These can be touched up to look like stone using the same technique that you used on the foam pieces. Basically, all you need to paint are the two horizontal supports on the front panel assembly and perhaps the gable supports that hang down on the sides. You'll also need to paint the gate and the hinges.
Second, you're going to want to mount a black light tube inside the crypt. We mounted ours against the horizontal frame support of the front assembly, so that it would be right over your head if you enter the crypt.
Third, you'll need a way to power the black light. You can mount a power strip on the left side of the front assembly. This can also power a fog machine or a CD player if you want your graveyard to have sound effects. (We used tracks from various Midnight Syndicate albums for our graveyard.)
Also, there are some other details you could add. For instance, you could cut two foam pieces to go between the gable supports at the end of the roof pieces to give the roof a more solid look.
A decoration at the top of the crypt really looked good. We had one of those cheap animated gargoyle door knockers which was broken and no longer worked. It served very well as some eye candy at the apex of the crypt frame.
Other embellishments could include some spider webbing, LED eyes in the skeleton in the panel detail, doors instead of a gate, a thunder and lightning machine, etc. Use your imagination!