
The skull has a moving jaw, rotates and
tilts by remote control. The glowing red eyes can be turned on and off
by remote control.

I thought it would be cool to make a skull that could speak to the kids as they approached the house... I ended up doing quite a bit more than that. The skull I made for Halloween 2000 has a moving jaw and it rotates and tilts by remote control. The glowing red eyes can be turned on and off by remote control as well.
As you can see, I used the skull to make a Grim Reaper. As people came up to the house, the Reaper (with my altered voice) turned his head and welcomed them to my haunt. This freaked a few people out ! The kids were fascinated by it - they would come up, look at it, talk to it - and I talked back to them thru a speaker under the Reaper’s robes.
The head motion is controlled with an airplane or car remote control unit. Its actually quite eery to have a skull turn its head and look at you with devil red eyes - then open its mouth and laugh insanely ! Its a great effect, but a bit complicated to build. If you have to buy everything including the radio control unit it would cost you $250 or so.
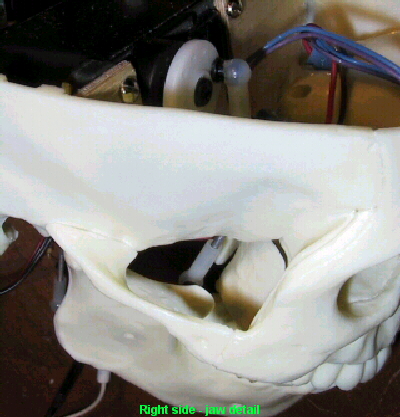
I started with a Skillcraft human skull model which I assembled leaving out a few of the inside parts which would get in the way of the robotics. Since I’m an R/C plane pilot I decided to use servos to move the jaw and skull. I cut thin plywood to the shape of the inside of the skull and glued it horizontally behind the eye sockets. The head tilt servo was mounted to this piece on aluminum brackets as you can see in the photo. A second piece of plywood was used to mount the jaw servo (its the upper one in the photo below).
The blue things with wires are heat shrink tubing with #47 incandescent bulbs inside for the glowing eyes. The red eyes are plastic jewels as used on front panel pilot lights.

The photo below shows some detail of the jaw servo mechanism. The servo wheel is attached to the jaw using ball joints and threaded rod which can be obtained from any good R/C supplier. The ball joints allow both ends of the rod to move freely - necessary because of the odd angles at which servo and jaw move. A ball joint is screwed into the inside of the jaw where it wont be seen - you can see the white nylon socket thru the side of the skull in the photo below.


The skull is controlled remotely with an R/C radio control. I used a six channel Airtronics unit. I made some mods to the transmitter for this application - I took the return springs out of the sticks because I found it easier to control the skull in a lifelike manner if it did not snap back to “neutral” (looking straight ahead) when I let go of the sticks. This also allowed my to conserve the batteries by placing the skull in a pose and turning off the TX. As long as you don’t move the sticks you can turn it back on and it will normally not move at all. I found it very effective to “pose” the skull, turn the TX off and when somebody came up the walk I’d move the sticks so the skull would move to look at them and then turn on the TX. As the transmitter turns on the eyes light up (if you have them turned on) and the skull turns very rapidly to the stick position you set. This gave people quite a start as the skull “came alive” and started talking to them !
The other mod to the TX was a direct input to one of the auxiliary channels via a 1/8 phono jack. What I had in mind was to build a circuit called an envelope filter to track my voice in real time - it gives a voltage output which is proportional to the volume of your speech. After looking at myself talk in a mirror for a while, I determined that your jaw opens generally in proportion to the volume of the sound your voice makes. So, if you use the envelope filter to control the jaw servo you get very lifelike jaw movement in exact sync with your voice. It actually did work but my envelope filter circuit was a bit too crude, causing the jaw to open and close a bit when there was no sound. I was running out of time so I decided to just animate the jaw with the left stick on the transmitter.
The Receiver and Eye Controls
The receiver was mounted to the back of the wooden “shoulders”, as was the RX battery pack and a separate 1200mah battery pack for the eyes. I used 6V incandescent bulbs for the eyes which are bright but they use a lot of power. I subsequently found some very bright red LEDs which have an eerie laser look to them, they would have looked neat. I added control to the eyes with an on/off motor controller used for electric R/C airplanes. If you use an R/C motor speed control (used in cars and electric planes) you can get proportional control of the eye brightness which would be cool but I didn’t have one.
The finishing touches were to add a robe, hood, a homemade reaper, and I used some cheesy plastic skeleton parts for the arms.
The sound setup:
I put a speaker under the robe so I could talk to the guests as the approached the Reaper. I wore a headset microphone plugged into my computer which has a Sound Blaster Live card in it. The SBLive has some very nifty real time effects - I used the pitch shifter to lower my voice about half an octave, and then I added some echo and chorus. I ran the output of the sound card to a 50 watt stereo amplifier and then to the hidden speaker. The result was an otherworldly voice which nobody recognized as me ! I stood by the door in the shadows so I could see what people were doing and saying but they couldn’t see who was running the Animatronic Reaper. It was great fun to scare the bejeepers out of people as they walked up to the house and converse with them through the animatron.
I’m not sure what I’ll do with the animated skull next year. It’s a very versatile prop. I may go for complete computer control next year and have it just sitting on a gravestone talking and laughing while I control some other diabolical new device...

Original URL: http://www.iosphere.net/%7Erheslip/html/animated_skull.html